OSDFIR Infrastructure in Minikube

Welcome to this guide on setting up the OSDFIR Infrastructure project using Minikube! OSDFIR Infrastructure is an open-source project that includes powerful digital forensics tools like Plaso and Timesketch. Helping to streamline digital forensic and incident response investigations, OSDFIR Infrastructure offers a set of tools that can be quickly deployed in a Kubernetes environment.
In this guide, we’ll walk you through the process of setting up OSDFIR Infrastructure on a Windows system using Minikube, a lightweight Kubernetes implementation that can run on a local machine. This setup will allow you to experiment with and evaluate the capabilities of OSDFIR Infrastructure in a contained environment.
Before we begin, make sure you have the following prerequisites:
- A Windows OS with Docker installed.
- A working directory set up (we’ll use
D:\OSDFIRfor this guide). - Some familiarity with the command line (we’ll be using PowerShell).
Let’s dive into the setup process, starting with installing Minikube!
Step 1: Install Minikube
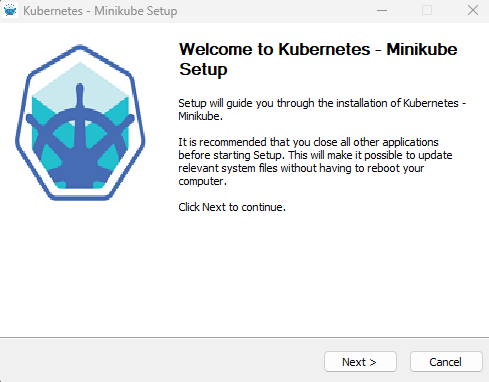
Download Minikube here and run the installer. Other then telling it where to install, there really not much to it!

To verify the install, run minikube.exe to display the help menu.

Minikube is installed and ready to go!
Step 2: Cluster creation
We are using Docker Desktop, thus Minikube finds and utilizes it automatically. If you’ve not yet installed Docker Desktop, see this installation guide.
Start Minikube with minikube start.
The start command output is below, they have neat emojis for your amusement. Note, the last line in the output shows we have a default namespace available. Though we can add our own namespaces, for this guide we’ll be staying with default. The output also shows kubectl is configured, which is handy, so we don’t have to do that separately.

We can see the minikube container running in Docker Desktop now, too.

Running minikube kubectl -- get po -A retrieves and displays a list of all the pods running across all namespaces in the Kubernetes cluster managed by Minikube. Note, the double dash -- is important, as it is meant to tell the minikube command that the following arguments are specifically for the kubectl command.

Here we see the kube-system namespace, used to house all the system components and resources that are necessary for running and managing the Kubernetes cluster itself.
If you want to take a look at the Kubernetes dashboard, we can run Start-Job { minikube dashboard} to have the dashboard run as a background process and still use our terminal. This should automatically open our default browser to the dashboard.

If you need to stop the background job, you can run:
Get-Jobto get theminikube dashboardcommand job “Id”- Then run
Stop-Job -Id #to stop the background job.
Alternatively, you can simply run minikube dashboard. The dashboard should open for you, to the URL provided. If not, just copy the URL and paste to a browser on the system you’re running minikube on. Though, this will keep the process running through the current terminal session. Using ctrl-c will stop the dashboard process.

When you get to the dashboard, you can see it is quite empty for now. Be sure to check back here later!

Step 3: kubectl
There are a couple option for this. From Step 2, we saw that Minikube comes with the kubectl. As an example, this command will show the kubectl help: minikube.exe kubectl -- --help.
Alternatively, you can used the kubectl command-line tool separately from the minikube command. The tool was already working for me after installing Minikube, though I have also simply downloaded from here, the executable for kubectl and placed it in my working directory D:\OSDFIR\kubectl.exe.
Step 4: Helm
For this step we will go through installing the Helm CLI, as describe here.
- Download Helm: We’ll be using the “Windows amd64” platform. For me, this downloaded version 3.15.4 as a zip file:
helm-v3.15.4-windows-amd64.zip - Extract the binary file: Place the file in our working directory
D:\OSDFIR\helm.exe
That’s all you need for the install, though the install page lists a plethora of options, if you desire a different method or are using a different platform.
Step 5: Using the OSDFIR Helm Chart
For this guide, we’ll go straight to using the “OSDFIR Infrastructure” Helm chart. The actual chart info is provided here. There are additional Helm charts if you only want certain tools.
To begin, we’ll add the repo using helm repo add <release-name> <repo>. We’ll use the release name of “osdfir-infra” and the Helm chart repository provided on Google’s osdfir-infrastructure GitHub page.
# PowerShell: Adding the osdfir-infrastructure Helm repo
./helm.exe repo add osdfir-infra `
https://google.github.io/osdfir-infrastructure/
If needed at times, to ensure that your local Helm client has the most up-to-date information about the charts, for the release names you’re using, run Helm’ list .\helm.exe repo list and update commands .\helm.exe repo update.

If you’re curious about where this repo information resides on your local system, you can run the .\helm.exe env command. Here is the output from my own system.
PS D:\OSDFIR> .\helm.exe env
HELM_BIN="D:\OSDFIR\helm.exe"
HELM_BURST_LIMIT="100"
HELM_CACHE_HOME="C:\Users\<profile>\AppData\Local\Temp\helm"
HELM_CONFIG_HOME="C:\Users\<profile>\AppData\Roaming\helm"
HELM_DATA_HOME="C:\Users\<profile>\AppData\Roaming\helm"
HELM_DEBUG="false"
HELM_KUBEAPISERVER=""
HELM_KUBEASGROUPS=""
HELM_KUBEASUSER=""
HELM_KUBECAFILE=""
HELM_KUBECONTEXT=""
HELM_KUBEINSECURE_SKIP_TLS_VERIFY="false"
HELM_KUBETLS_SERVER_NAME=""
HELM_KUBETOKEN=""
HELM_MAX_HISTORY="10"
HELM_NAMESPACE="default"
HELM_PLUGINS="C:\Users\<profile>\AppData\Roaming\helm\plugins"
HELM_QPS="0.00"
HELM_REGISTRY_CONFIG="C:\Users\<profile>\AppData\Roaming\helm\registry\config.json"
HELM_REPOSITORY_CACHE="C:\Users\<profile>\AppData\Local\Temp\helm\repository"
HELM_REPOSITORY_CONFIG="C:\Users\<profile>\AppData\Roaming\helm\repositories.yaml"
Looking at the HELM_REPOSITORY_CACHE folder (next to last line) we have a yaml file named after our repository for the OSDFIR Infrastructure Helm chart. For this write-up, we will not be modifying this file, so don’t make changes, but here is a look.

Step 6: Deploying the repo
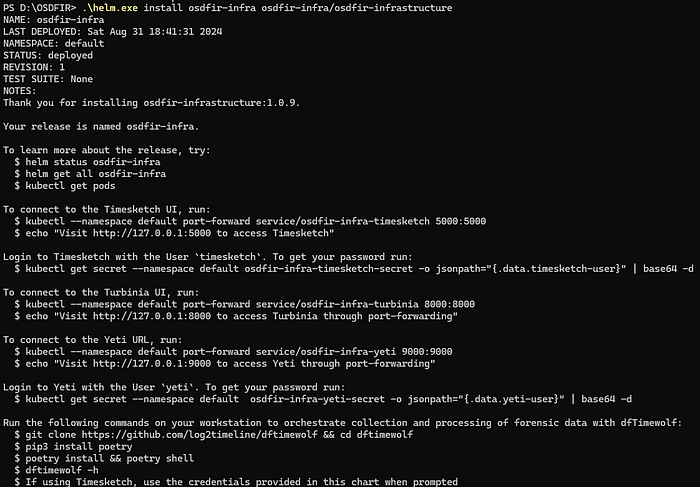
Now that we have added the OSDFIR Infrastructure repo to our local Helm repo, we can start deployment to our Minikube cluster. For this, we’ll use Helm’s install command.
# Powershell: Installing the Helm release
.\helm.exe install osdfir-infra osdfir-infra/osdfir-infrastructure
Command break down:
install: This is a Helm sub-command used to install a Helm chart. When you runhelm install, you are instructing Helm to deploy the resources defined in a chart onto your Kubernetes cluster.osdfir-infra: This is the release name for the deployment.osdfir-infra/: This is the name of the Helm repository where the chart is located. In this case, it matches our release name./osdfir-infrastructure: This is the name of the chart within theosdfir-chartsrepository that you want to install.
After the installation, there is a notes section that is shown to guide you to the install resources.

You you need to display these notes again later use the command:
.\helm.exe status osdfir-infra
Use .\kubectl.exe get pods to get the pod status, it may take several minutes for all pods to show the running status.

For storage related information, you can also get the status of the persistent volumes PV and the persistent volume claims PCV.
./kubectl.exe get pvc: these will show the status ofbound, when ready for use../kubectl.exe get pv: The bound status can also be seen here.

Note: Another item to keep in mind is the “Reclaim Policy”. The default policy for this project is Delete, see these instructions for Google’s steps for production ready deployments.
Step 7: Accessing the OSDFIR tools
As a reminder, we can re-access the OSDFIR Helm notes for our release, with this command: .\helm.exe status osdfir-infra
Here we see options to access our resources.

Timesketch:
Below is the specific Timesketch portion of the Notes:

Since we are using PowerShell here, there are some differences to consider with the command formats. So I’ll make adjusts and attempt to explain what I’m doing as we go.
We’ll run two commands together here to get us started. Though, you can see I still use the base command provided in the notes, from within. The reason I’m formatting the command this way, is so we can have our command and still use the terminal window after execution.
# PowerShell: Accessing Timesketch
Start-Job -ScriptBlock { kubectl.exe --namespace default `
port-forward service/osdfir-infra-timesketch 5000:5000 } ; `
Start-Sleep -Seconds 5 ; `
Start-Process "http://127.0.0.1:5000"
This PowerShell command sequence does the following:
- Starts a Background Job:
Start-Job -ScriptBlock { ... }runs thekubectl.exe port-forwardcommand in the background. This command sets up port forwarding from port 5000 on your local machine to port 5000 on theosdfir-infra-timesketchservice running in thedefaultnamespace of your Minikube Kubernetes cluster. Running it as a background job (Start-Job) allows the PowerShell session to remain free for further commands. - Waits for 5 Seconds:
Start-Sleep -Seconds 5pauses the script execution for 5 seconds to give the port-forwarding time to initialize and become active. - Opens a Web Browser:
Start-Process "http://127.0.0.1:5000"opens the default web browser to the URLhttp://127.0.0.1:5000, which connects to the Timesketch service via the port-forward that was just established.
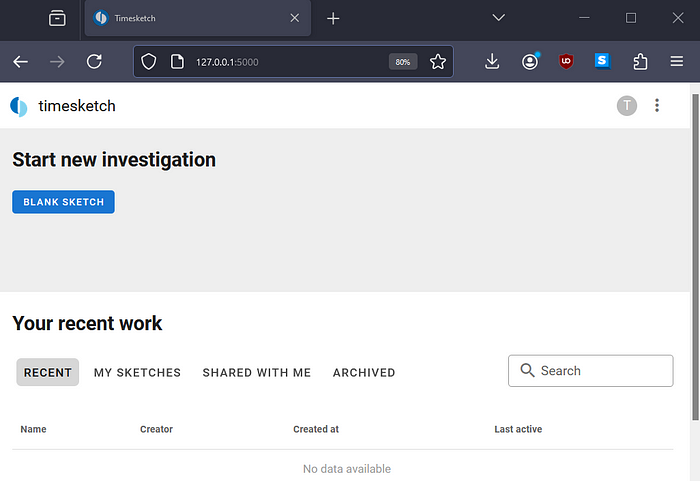
So now we see the command output and the job ID. Plus, the browser opens up to the Timesketch login page after.


Now we need to get our Timesketch credentials. The Notes show we have a default user in Timesketch that is named “timesketch”. Unfortunately though, the “base64 -d” command in the notes above does not work in PowerShell. Though, we can still get that Timesketch password and decode it. Here is how we can achieve a similar result with PowerShell.
# PowerShell: Getting the Timesketch password for the 'timesketch' user
# Copy the entire command below and paste into the PowerShell terminal
[System.Text.Encoding]::UTF8.GetString([Convert]::FromBase64String( `
(.\kubectl.exe get secret --namespace default `
osdfir-infra-timesketch-secret `
-o jsonpath="{.data.timesketch-user}")))
.\kubectl.exe get secret --namespace default osdfir-infra-timesketch-secret -o jsonpath="{.data.timesketch-user}": This part of the command useskubectl.exeto interact with the Kubernetes API.get secret: retrieves a specific secret namedosdfir-infra-timesketch-secretin thedefaultnamespace.-o jsonpath="{.data.timesketch-user}": specifies the output format using a JSONPath expression to extract the value of thetimesketch-userfield from the secret's data. This value is encoded in Base64 format.[Convert]::FromBase64String(...): This part converts the Base64-encoded string retrieved from the secret into a byte array. TheFromBase64Stringmethod is used for decoding a string that was encoded in Base64.[System.Text.Encoding]::UTF8.GetString(...): This part converts the byte array into a readable UTF-8 string, effectively decoding the Timesketch user’s password from its Base64-encoded form to plain text.

Now we have our Timesketch default user credentials and can log in.

Turbina:
Here is the Notes section for Turbina. We’ll take a similar approach to access Turbina through PowerShell background jobs.

Here is the command we are using:
# PowerShell: Accessing Turbina
Start-Job -ScriptBlock { kubectl.exe --namespace default `
  port-forward service/osdfir-infra-turbinia 8000:8000 } ; `
  Start-Sleep -Seconds 5 ; `
  Start-Process "http://127.0.0.1:8000"
Yeti
Next we’ll access the Yeti UI. Here again, are the OSDFIR notes for setting that up.

Here’s what we’ll do for this in PowerShell, similar to what we used previously:
# PowerShell: Accessing Turbina
Start-Job -ScriptBlock { kubectl.exe --namespace default `
  port-forward service/osdfir-infra-yeti 9000:9000 } ; `
  Start-Sleep -Seconds 5 ; `
Start-Process "http://127.0.0.1:9000"Start-Job: This starts a new background job in PowerShell. The-ScriptBlockparameter specifies the code to run in the background.kubectl.exe --namespace default port-forward service/osdfir-infra-yeti 9000:9000: This part of the script useskubectl.exeto set up port forwarding.--namespace default: Specifies the Kubernetes namespace where the service is located (defaultin this case).port-forward: Thekubectlsub-command used to create a tunnel from your local machine to a Kubernetes service.service/osdfir-infra-yeti 9000:9000: Forwards port 9000 on your local machine to port 9000 on theosdfir-infra-yetiservice running inside the Kubernetes cluster.Start-Sleep -Seconds 5: This command pauses the script execution for 5 seconds. This is done to give the port-forwarding process some time to initialize and establish a connection before opening the browser.Start-Process "http://127.0.0.1:9000": This command opens the default web browser and navigates tohttp://127.0.0.1:9000, where the Yeti service is now accessible due to the port forwarding established in the background job.

Now the browser will show the Yeti login page. So next, we’ll get the credentials for the “yeti” user.
# PowerShell: Getting the Yeti password for the 'yeti' user:
# Copy the entire command below and paste into the PowerShell terminal
[System.Text.Encoding]::UTF8.GetString([Convert]::FromBase64String( `
(.\kubectl.exe get secret --namespace default `
osdfir-infra-yeti-secret `
-o jsonpath="{.data.yeti-user}")))
.\kubectl.exe get secret --namespace default osdfir-infra-yeti-secret -o jsonpath="{.data.yeti-user}": This part of the command useskubectl.exeto interact with the Kubernetes API.get secret: retrieves a specific secret namedosdfir-infra-yeti-secretin thedefaultnamespace.-o jsonpath="{.data.yeti-user}": specifies the output format using a JSONPath expression to extract the value of theyeti-userfield from the secret's data. This value is encoded in Base64 format.[Convert]::FromBase64String(...): This part converts the Base64-encoded string retrieved from the secret into a byte array. TheFromBase64Stringmethod is used for decoding a string that was encoded in Base64.[System.Text.Encoding]::UTF8.GetString(...): This part converts the byte array into a readable UTF-8 string, effectively decoding the Yeti user’s password from its Base64-encoded form to plain text.


We are now logged into Yeti!
Wrap-up
Congrats on getting the OSDFIR Infrastructure set up with Minikube! You’ve now got a local Kubernetes environment running with some handy open-source digital forensic tools. This setup is a great way to get familiar with what these tools can do and how they might fit into your workflow. To learn more about the OSDFIR Infrastructure project, visit the GitHub page.
Connect!
I hope this guide has been helpful in getting you started with OSDFIR Infrastructure! If you have any questions, ideas, or just want to share your experience, let’s connect on LinkedIn. I’m always interested in chatting about digital forensics and learning from others in the field!
Thanks!
